A grounding yoga practice to help you feel grounded, supported, and steady in your body.
When the nervous system doesn’t feel safe, the body responds.
You may feel anxious, restless, disconnected, or exhausted but still wired. Sleep can feel hard to achieve. Digestion can feel off.
This isn’t a mindset problem.
It’s a regulation problem.
Yoga therapy works with the body. When you create physical steadiness, slow your breath, and feel contact with the ground, Signals of safety are sent to your nervous system.
Safety is not an idea.
It is a sensation.
That’s why you need yoga for safety and stability.
What safety feels like in the body
Steady breath
Weight through the feet
A soft belly
A sense of “I am here”
Less urgency, more presence
When these sensations increase, the nervous system shifts out of survival mode (fight or flight) and into regulation (rest and digest).
A grounding practice for nervous system safety
This sequence focuses on contact, compression, and slow rhythm — three key inputs that support regulation.
1. Supported Squat or Seated Fold
Feel your feet or sit bones rooted into the ground. If squatting use a block to rest your sit bones on. Taking the strain out of your legs when holding a deep squat.
Stay for 5–8 slow breaths.
2. Knee-to-Chest (Supine)
Gentle compression across the belly.
Breathe into the back ribs.
3. Simple Forward Fold
Allow the head and neck to soften.
Exhale longer than you inhale.
4. Standing with Awareness
Stand with feet hip-width apart.
Press down through all four corners of the feet.
Pause. Notice.
A simple grounding yoga sequence
moving towards the mat for more relaxation
Breath work for feeling safe
Try this simple rhythm:
Inhale 4
Exhale 6
Longer exhales stimulate the vagus nerve and support parasympathetic tone — the branch of the nervous system associated with rest and repair.
No visualization required.
Just breath. Just be here now.
Everyday regulation practices
Walk slowly and feel your steps
Place one hand on your lower belly and breathe
Lean your back against a wall
Spend time outdoors noticing physical sensation
These small inputs accumulate. Safety builds gradually.
.
A grounding meditation
Try the practice outside for maximum benefit.
Sit comfortably
Close your eyes
With each exhale, deepen your connection to the ground where you are sitting
Visualize a ball of red light at the base of your spine. The ball contains all you need to feel safe and secure
With each inhale, make the ball bigger
If you want to use a mantra to support yourself, try repeating
I am here.
Find an affirmation that resonates and repeat when meditating or say throughout the day
I belong
I am here
I have everything I need
With every breath, I release anxiety and fear
I inhale peace and exhale anything that no longer serves me
More practices to help you feel stable and grounded
Roll your feet with a foam roller or a tennis ball
Walk outside barefoot
Take savasana or rest pose under a weighted blanket or cocoon yourself in a blanket
Try gardening. When we are close to the earth we naturally feel more grounded
The foundation of healing
Before insight.
Before transformation.
Before growth.
There must be safety.
Yoga therapy doesn’t force change. It restores the conditions where change can become possible.
For women, it’s a fact that our body fat tends to shift to the abdominal or belly area in mid-life. This is because our estrogen levels drop during menopause. And it is the estrogen that has an effect on where our fat is stored in our bodies.
Why our midsection changes during menopause
Abdominal changes in midlife aren’t just about calories. Hormonal shifts, sleep disruption, and stress can affect metabolism and how your body stores energy.
Fluctuating estrogen affects insulin sensitivity
Chronic stress can elevate cortisol and favor central fat storage
Poor sleep disrupts appetite and glucose regulation
Yoga doesn’t target fat loss directly, but it supports the systems that influence abdominal changes.
That extra belly fat carries with it some serious health risks. Like for example;
High blood pressure
Sleep apnea
Heart disease
Sleep apnea
Diabetes
Cancers
Stroke
Fatty liver
Greater risk of early death
The trouble with abdominal fat is that it’s not just subcutaneous fat (just below the skin). Belly fat also includes visceral fat, which is inside the abdomen and surrounds our internal organs.
Why can yoga reduce belly fat?
Some yoga poses directly target the abdomen so this means you will be working the muscles
As well as a good way of working your muscles yoga also helps to reduce stress, which is a contributing factor to belly fat.
Making a regular yoga practice part of your daily routine can help manage tension and anxiety. This improve your overall health and helps stop weight gain.
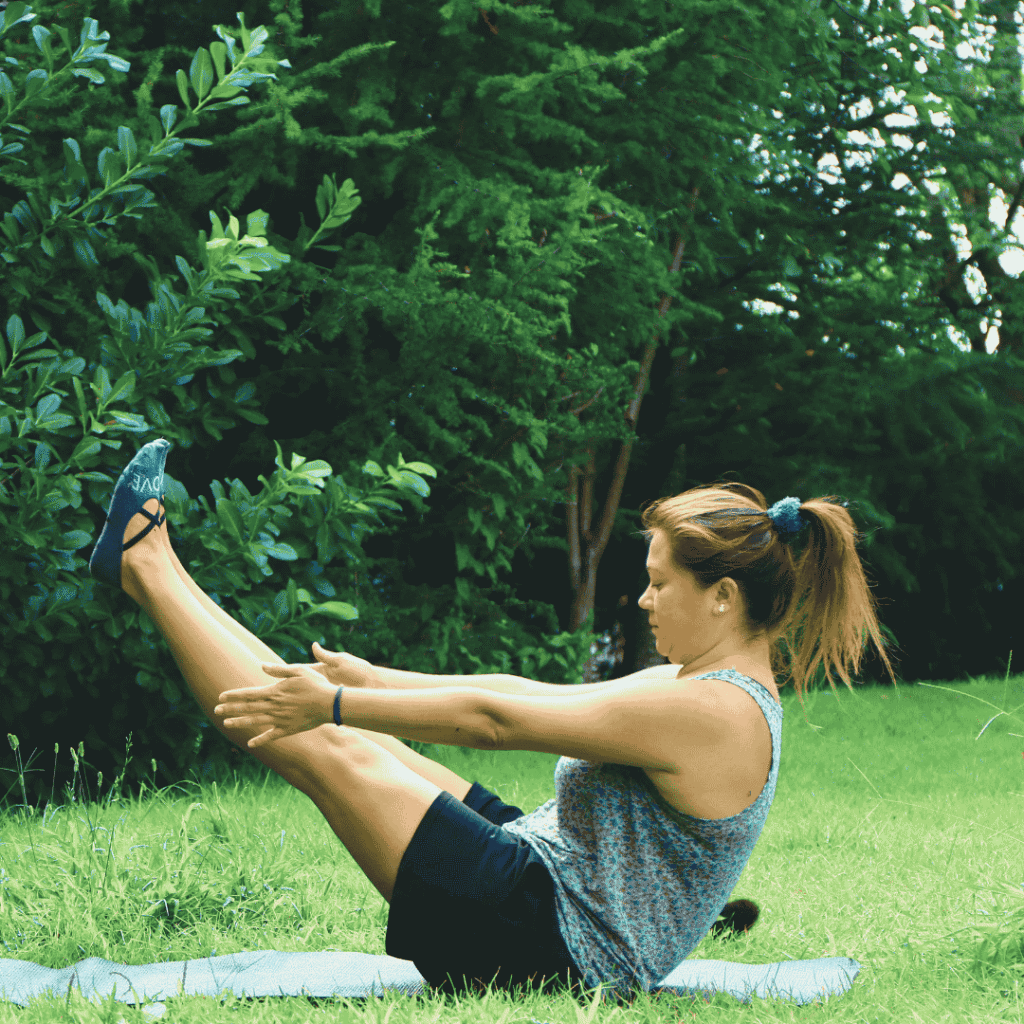
This is a killer. Try work up to each boat for 5 breaths. And do that 5 times. You will feel it in your core and probably your hip flexors. Bend knees, or hold the back of your thighs as you need.
If this feels super intense. You can build up to boat. Start by doing a lying down version. Lie on your back on the mat and lift your legs up. Very like boat but your back is supported.
How to do it
Sit on your mat with bent knees and feet flat on the floor.
Lean back slightly, then engage your core, and lift up your feet.
Try to straighten your legs, and reach your arms out in front of you.
If you need to, you can hold the backs of your thighs.
What are the benefits?
Strengthens your core muscles.
Tones and firms your tummy area.
Improves your balance and posture.
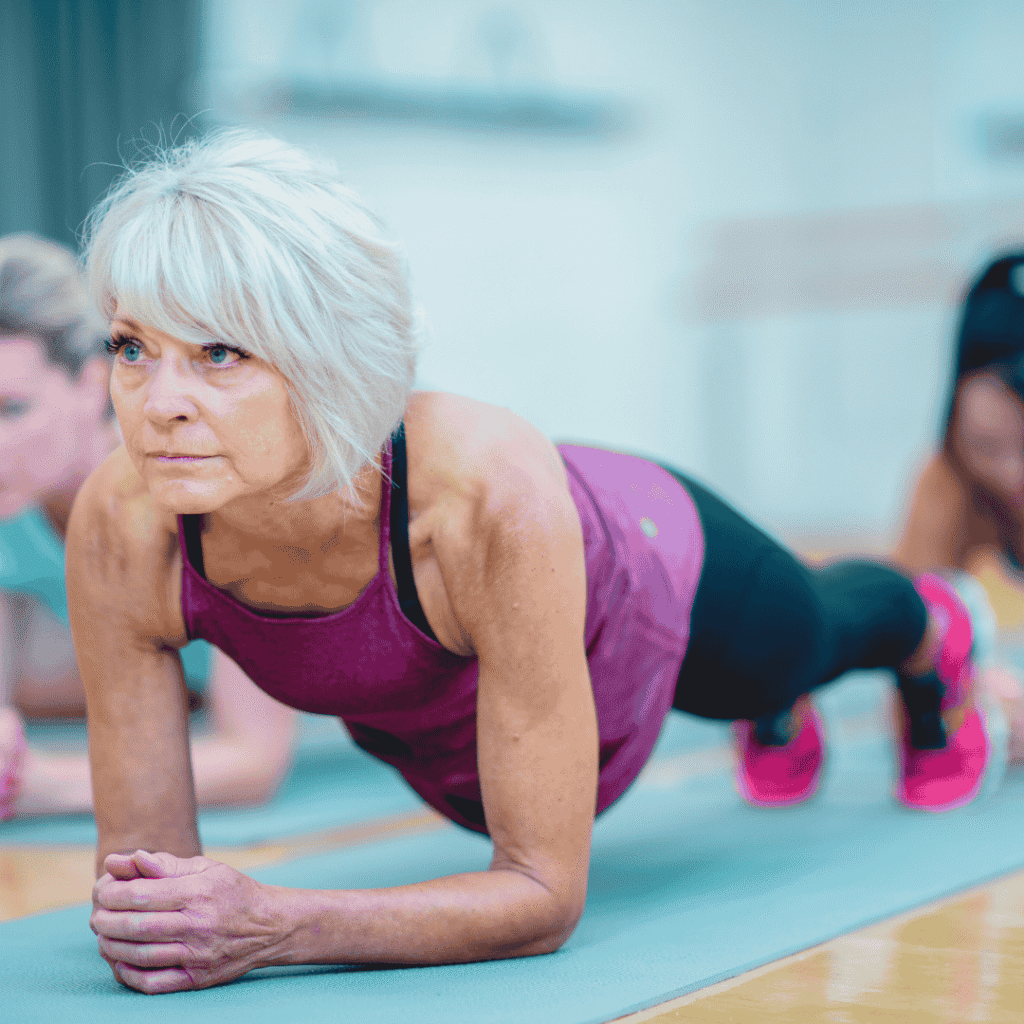
2 . Plank Pose
Planks are a great core exercise. As well as working your core, you strengthen your shoulders, arms, and legs.
How to do it
You can choose straight arms or balance on your forearms, let your wrists decide
Come to a high push-up position with your hands directly under your shoulders and your body in a straight line.
Don’t let your butt come too high.
Draw your belly button toward your spine to engage your abs,
Hold for 30 seconds and do 3 times
What are the benefits?
Engages the entire core, including the lower abdomen.
Builds strength in the arms, shoulders, and back.
Enhances overall body stability
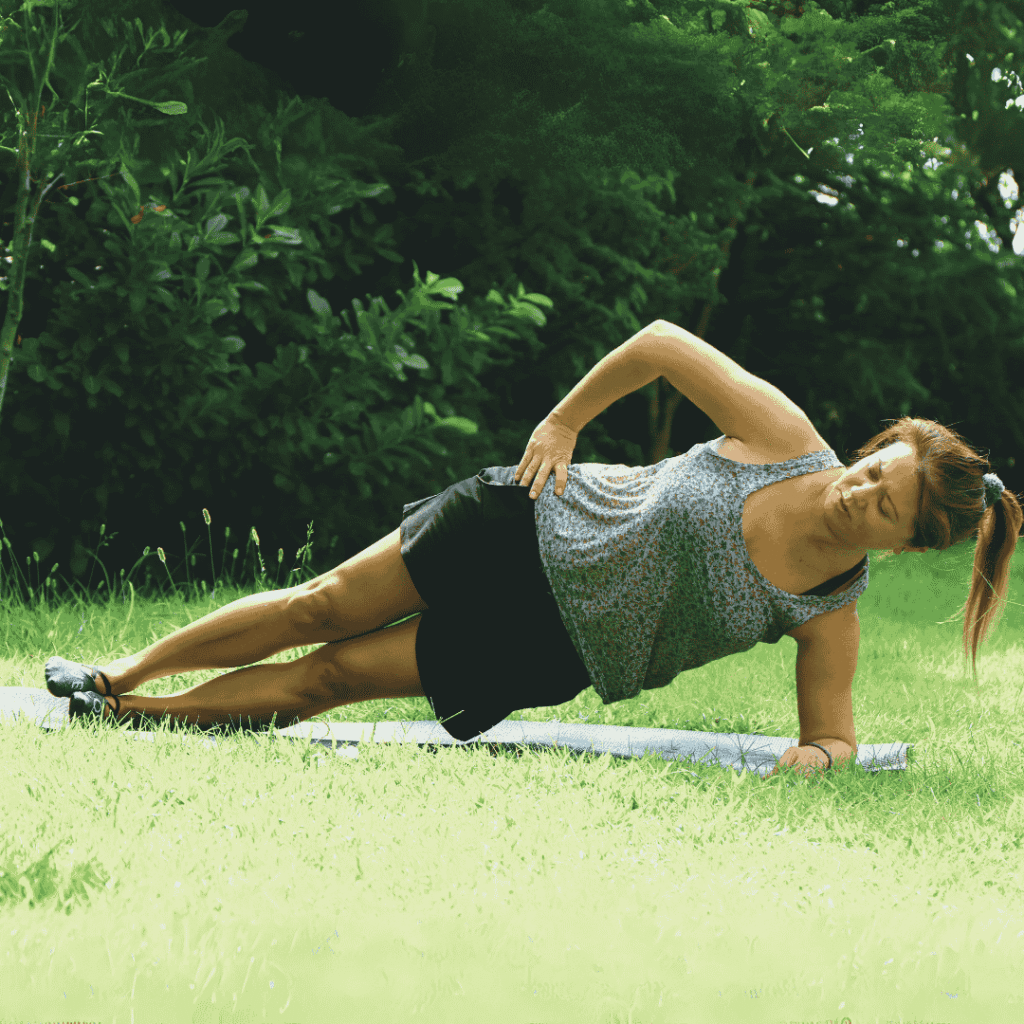
3. Side Plank Pose
The side plank targets your obliques, which are the muscles at your waist.
How to do it
Working one side at a time
Lie on your side on the mat
Rise up onto your elbow or have a straight arm make sure wrist and shoulders are stacked
Make sure your lift your bottom hip away from the floor to work your obliques
If you can stack one foot above the other or as an extra challenge raise your upper leg
If this is super challenging you can always start by keeping your lower legs on the mat and just doing small side hip raises
Do for three sets of 30 second planks per side.
What are the benefits?
Great for your balance
Strengthens your core , arms and shoulders
Strengthens your obliques (waist)
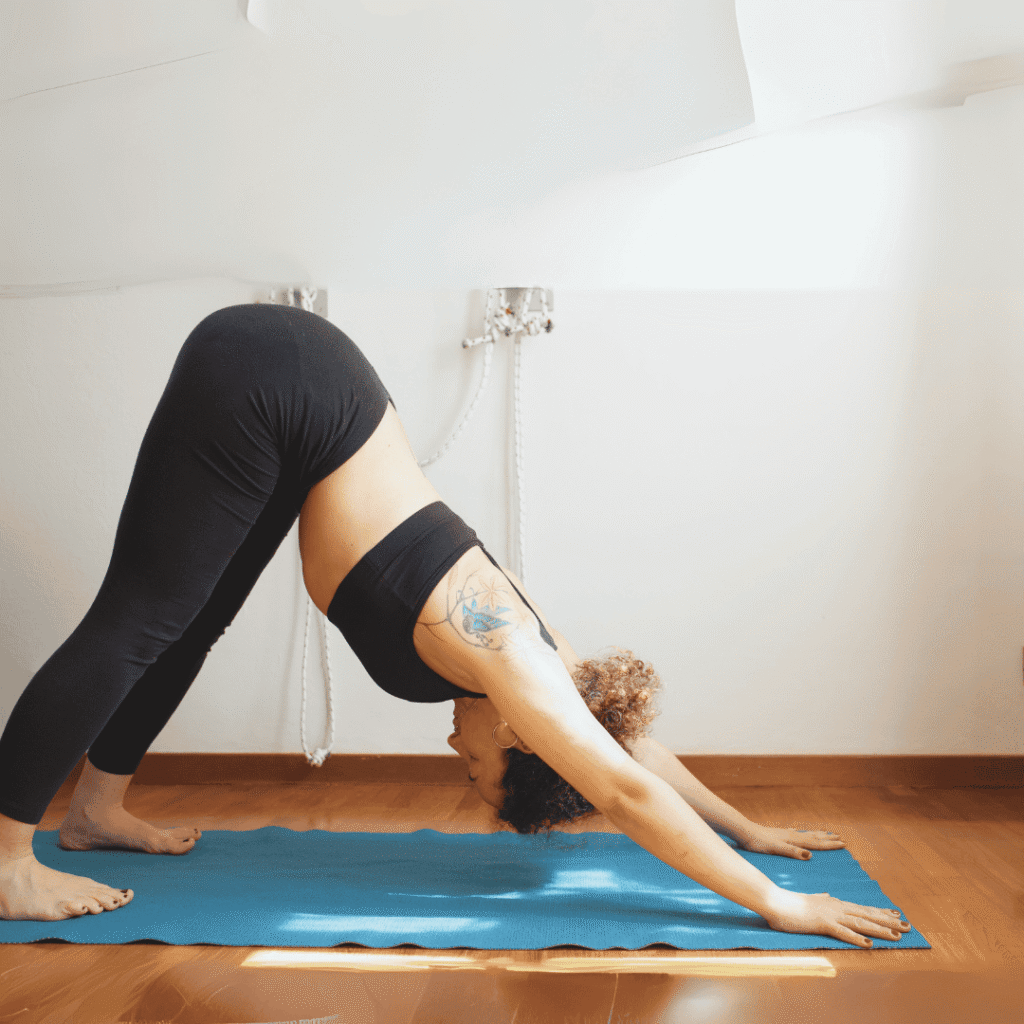
4. Downward Facing Dog Pose
Excellent pose for strengthening as it is weight bearing. Also amazing for stretching the whole back of your legs and back.
How to do it
Start on your hands and knees in tabletop
Hands shoulder width apart and your knees hip-width apart.
With bent knees lift your tailbone up
Straighten your arms
Your legs can remain bent
Gradually let your heels sink down , they may touch the floor and your legs may be straight it depends on how tight your hamstrings and calves are
Keep your head and neck loose and relaxed
Hold for 5 breaths and then return to tabletop or go into child’s pose.
What are the benefits?
Stretches and elongates the abdominal muscles
Relieves stress and tension in your lower back
Improves flexibility in the spine and hamstrings
5. Cobra Pose
Strengthens your back, tones your belly and firms the waist. Improves your flexibility in your spine.
How to do it
Lie on your stomach with your hands beside your ribcage
Squeeze your legs together like a cobra tail
Press your toenails into the mat
Lengthen your spine as you lift your head, shoulders, and chest, off the mat. pressing lightly into your hands
Keep your shoulders away from your ears, your neck long, look forwards, don’t arch the neck back
Hold for 5 breaths before releasing to the mat. Try and do this 2 or 3 times.
A nice counter pose can be downward facing dog or child’s pose.
What are the benefits?
Strengthens your back muscles
Tones your abdomen and waist
Improves spine flexibility
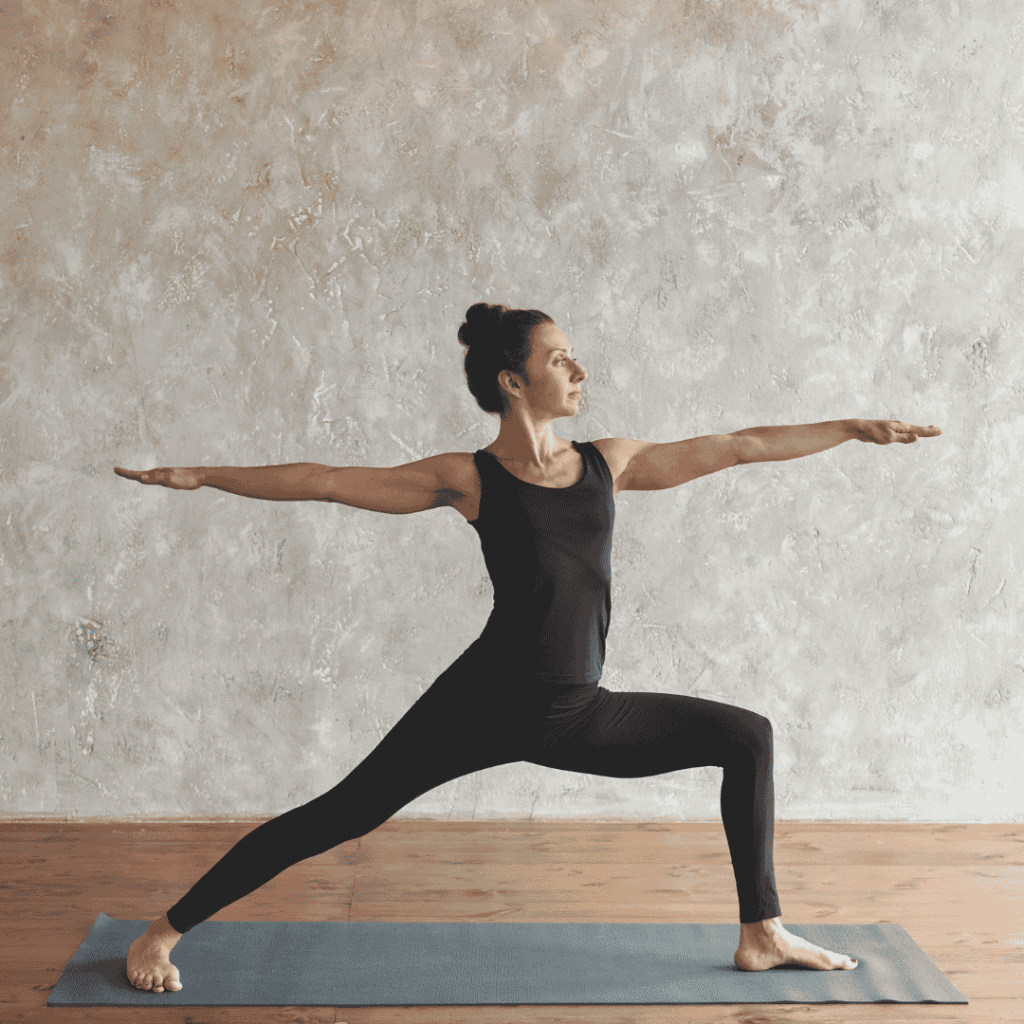
6. Warrior 2
How to do it
Start in a high lunge
Turn your back foot out to a 90-degree angle
You can align your front heel with your back arch or take a wider stance depending on how it feels in your hips and pelvis
Bend your front leg and keep your knee behind your toes also make sure your knee doesn’t cave inward
Stretch your arms out to the sides and gazing over your middle finger
Hold for 5 breaths then change sides.
What are the benefits?
Engages your core and tones the waistline
Strengthens your legs and inner thighs
Helps balance and concentration
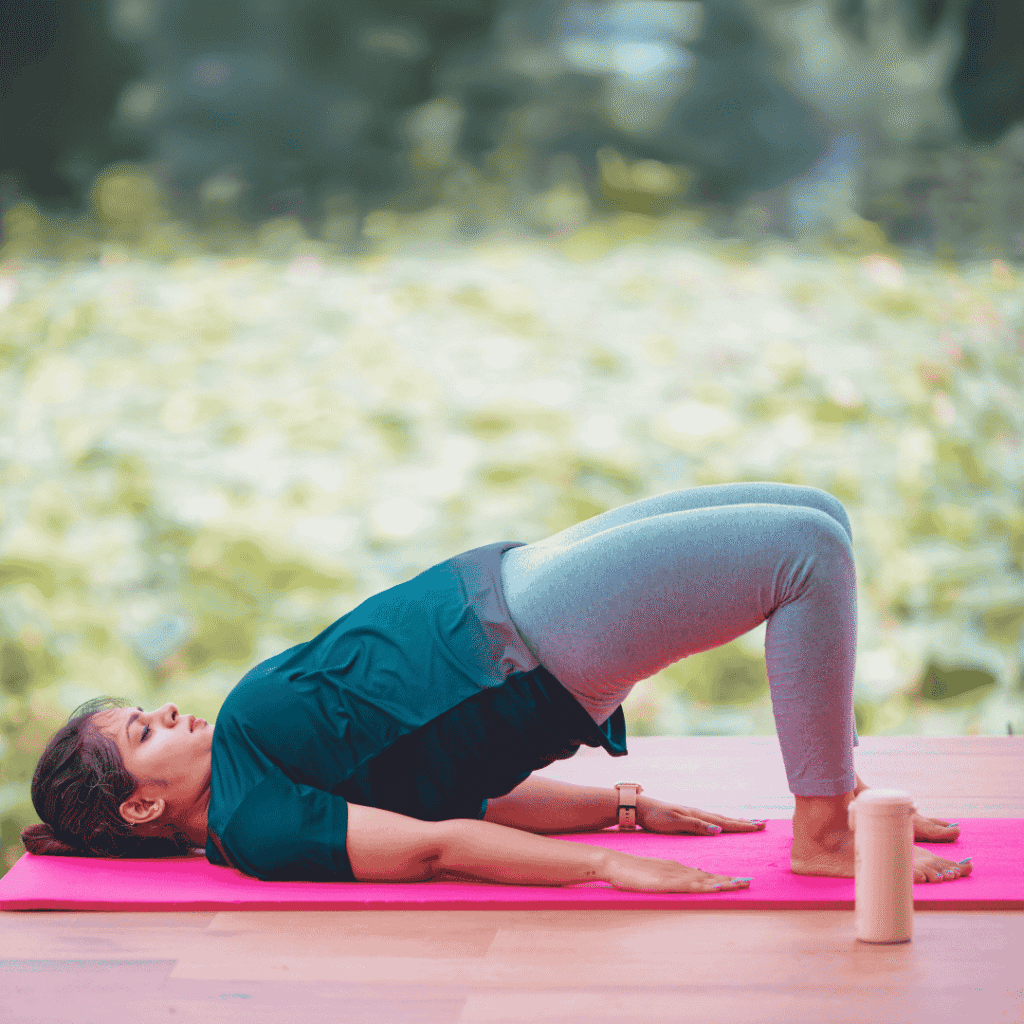
7. Bridge Pose
This is a backbend. It is great for losing belly fat. It works abs and glutes and also amazing for pelvic your floor. The best way to work your pelvic floor is to put a block between your knees and squeeze it as you rise up to into bridge pose.
How to do it
Lie on your back with your knees bent and feet flat on your mat
Lift your hips up towards the ceiling, keeping your feet and arms flat on the floor
Squeeze your glutes as you raise up your pelvis
Work up to holding your bridge for 30 seconds, and repeat three times
What are the benefits?
Activates your abdominal muscles
Stretches your spine and opens the chest
Tones your butt and thighs
Supports posture and pelvic floor
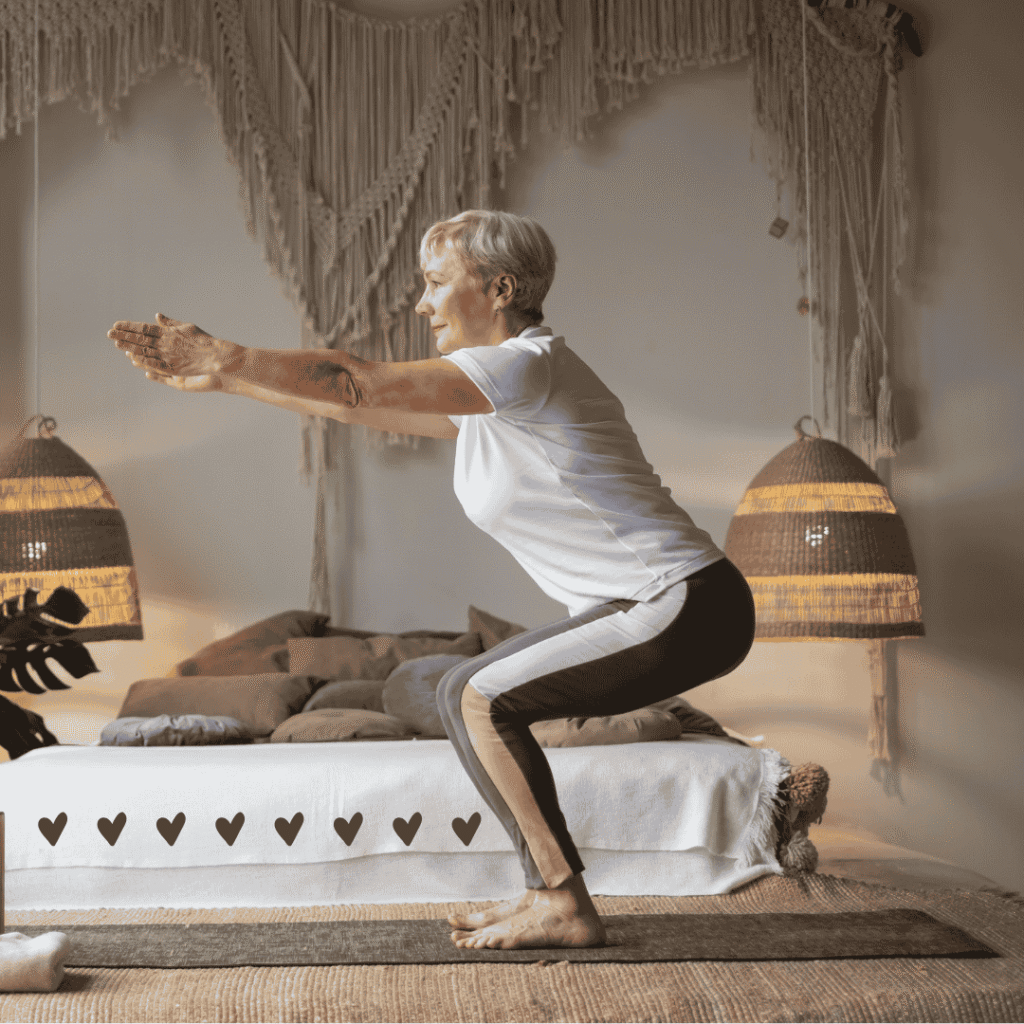
8. Chair Pose
For this pose you want to sink into an imaginary chair while keeping your core tight and engaged. If your shoulders allow try and have your forearms glued to your ears with hands pointing upwards.
As you hold the squat position you are using your ab muscles to lift your torso and spine straight. It’s a great workout for your lower body. Make sure not to let your upper body collapse to get the best core benefits.
How to do it
Stand with your feet together and reach your arms up overhead if your shoulders allow
Bend your knees, shift your weight into your heels, and hinge from the hips
Move your butt back as if sitting in a chair
Engage your core, lift your chest, keep your neck and spine long
Make sure your knees and shins are back, so you can still see your toes
Hold your chair pose for 30 to 45 seconds, and repeat three times
What are the benefits
Activates your core and lower abdominal muscles.
Strengthens your thighs and butt.
Improves posture and balance.
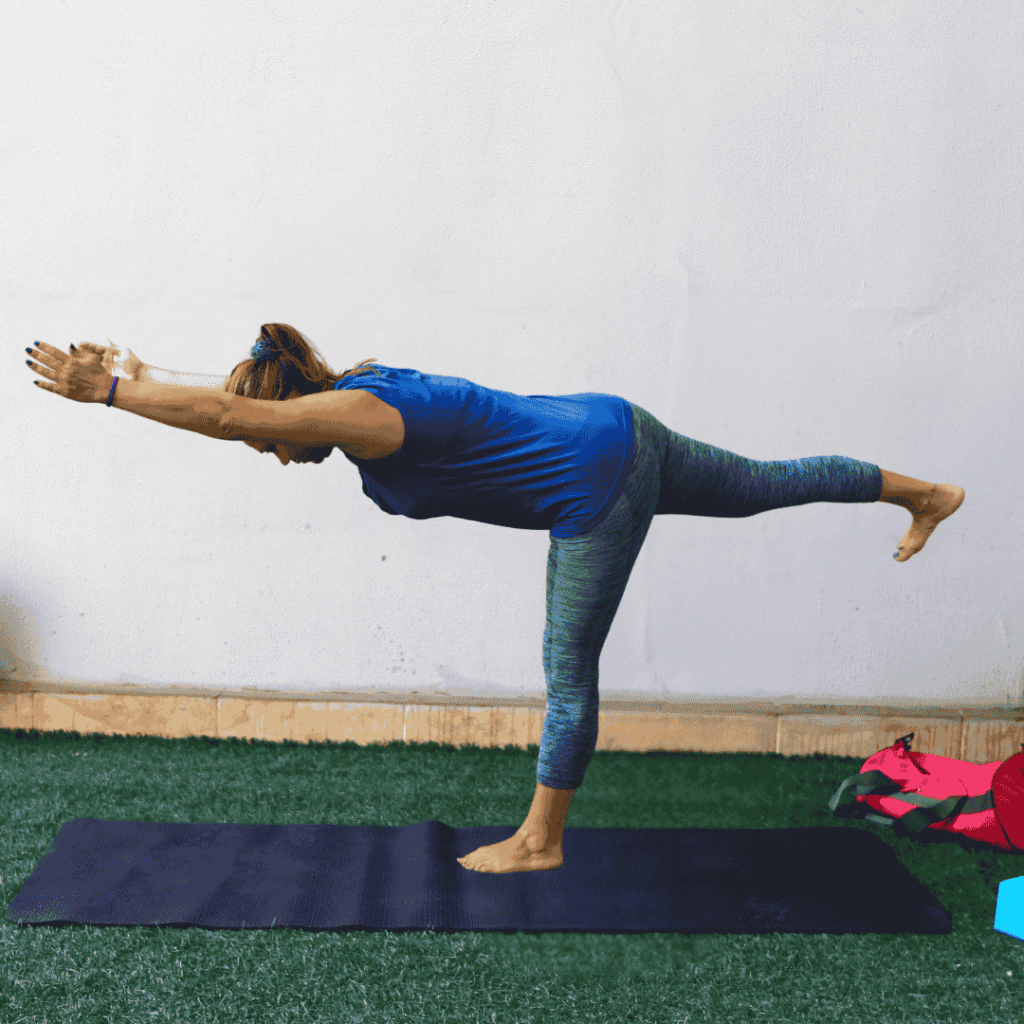
9. Warrior 3
This is a superb weight bearing, balancing pose. You will feel it in your core and hip flexors.
How to do it
Start in a standing position with your feet hip-width apart and arms at your sides
Put weight into your right leg
Lift your left leg back behind you off the floor
At the same time, hinge forward at your hips and bring your torso parallel to the mat. Hips face the floor.
Reach your arms forward, keeping them in line with your shoulders and your palms facing each other
Engage your core by pulling your belly button in
Hold the pose for 5 breaths, then return to standing and repeat on the other side.Do this 2 or 3 times.
What are the benefits?
Works on stability and balance
Tones the abdominal muscles
Strengthens the legs and glutes
Improves concentration and focus
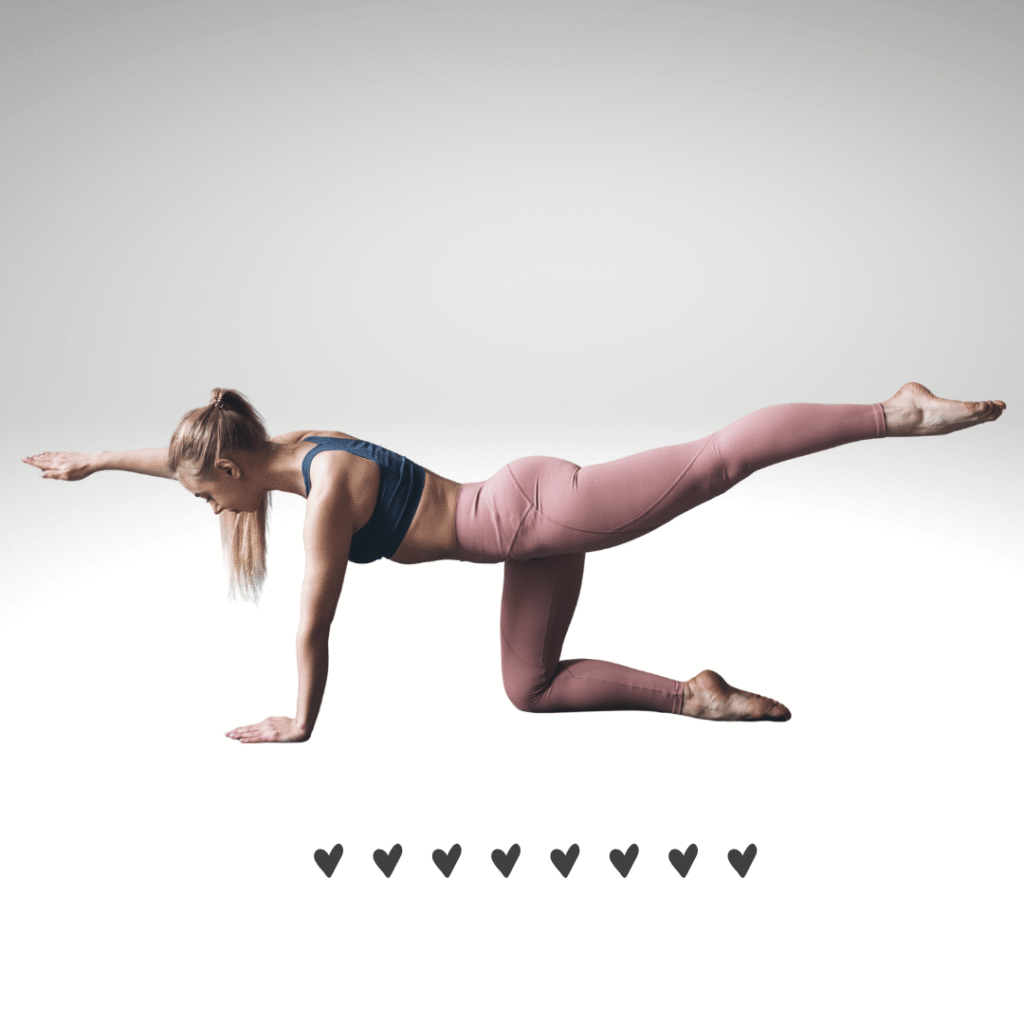
10. Bird Dog
How to do it
Start on all fours in tabletop, your wrists should be under your shoulders and knees under your hips
Reach your right arm forward while extending your left leg backward
Keep your core muscles engaged and stretch from fingertips to toes
Hold for 5-10 breaths and switch sides. Try and do 5 sets each side.
For a challenge, rather than opposite leg and arm is to try same side arm and leg. This is great for working your waist and any weakness on one side over another.
What are the benefits?
Engages the entire core to help lose belly fat
Strengthens the lower back muscles
Tones the butt and shoulders
Improves posture and balance
Focus on the system, not the scale
The goal isn’t to flatten your belly overnight. It’s to support core balance, metabolism, and overall regulation.
Consistency, quality sleep, mindful breathing, and gentle, targeted yoga often lead to more meaningful, sustainable changes than high-intensity exercise alone.
I would suggest the above 10 poses be combined with the yoga poses suggested in my article below.
Pickleball is fun, social and friendly! The rules are simple and the game is easy for beginners to learn, but can develop into a fast-paced, competitive game.
Yoga for pickleball players isn’t about passive stretching. It’s about building joint stability, mobility, and recovery capacity so you can stay strong on the court — and keep playing long-term.
Overhead swings and repetitive paddle motion overload the front of the shoulder.
Focus on:
Thoracic spine mobility
Scapular stabilization
Posterior shoulder strength
Helpful movements:
Thread the Needle
Low cobra (gentle spinal extension)
Supported plank variations
2. Tennis Elbow & Wrist Irritation
Repetitive gripping stresses forearm tendons.
Support with:
Wrist mobility drills
Forearm strengthening
Gentle nerve-glide style movements
Avoid aggressive stretching when inflamed.
3. Hip Tightness & Lateral Instability
Pickleball demands quick side-to-side movement.
Without hip mobility and glute strength, knees and low back compensate.
Helpful movements:
Low lunge variations
Chair pose for controlled strength
Side-lying leg lifts
Controlled single-leg balance work
This builds stability for faster reaction time.
A simple pre-play yoga warm-up (5–8 minutes)
Before you step onto the court:
Cat–Cow (spinal mobility)
Dynamic low lunges (hip opening)
Shoulder circles + scapular push-ups
Light chair pose pulses
Single-leg balance with gentle rotation
This prepares joints and activates stabilizers.
A post-play recovery sequence (8–10 minutes)
After play, focus on down-regulation and tissue release:
Supine twist
Figure-four stretch
Supported forward fold
Gentle chest opener
3–5 minutes slow diaphragmatic breathing
This supports tissue recovery and helps your nervous system shift out of high alert mode.
Better recovery time builds resilience.
Great yoga poses for pickleball
Here are some poses for you to try. Never stretch beyond your limits. You may notice an element of slight discomfort but you should not feel pain. Yoga is a balance of effort and ease, you should always be able to breathe comfortably in the poses.
1. Cow Cat
Releases tension in your spine and hips. Great after a long pickleball game.
2. Down Dog
Stretches the back of your legs and back, strengthens your arms, shoulders and legs. Is weight bearing.
3. Cobra
Stretches your psoas, and hip flexors, strengthens your back and glutes.
4. Childs Pose
A counter pose after cobra, this stretches out your lower back. Again super nice after a pickleball game if you feel it in your back.
5. Side Plank
Is a weight bearing pose. Strengthens your arms, shoulders and core & helps with your balance.
6. Twisted Triangle
is also weight bearing. Works on your balance, strengthens your legs and core, opens up your chest and shoulders.
7. Tree Pose
This is great for balance, your core strength and leg strength & working on sharpening your focus.
8. Pigeon Pose
This is a great hip opener.
9. Bridge
Strengthens your glutes, back and core
10. Supine Twist
Releases tension in your lower back.
11. Legs up the Wall
A gentle inversion and a stretch for your back and legs, good for tired feet and legs after a game.
The difference between a yoga class and yoga therapy
A general yoga class can be beneficial for strength and flexibility.
Yoga therapy is different.
It isn’t prescriptive or formula-based. It doesn’t assume every shoulder or knee needs the same “fix.”
Instead, yoga therapy is responsive.
Sessions are shaped around how your body is presenting that day — your current tension patterns, fatigue levels, recovery capacity, and overall load from sport and life.
For pickleball players, that might mean:
Supporting recovery after a tournament weekend
A personalized yoga practice for resilience/recovery
Creating space in overworked shoulders
Building steadiness after repeated lateral strain
Helping your system settle after high-adrenaline play
It’s less about correcting and more about restoring balance.
Rather than pushing harder, the work is to help your body reorganize, adapt, and stay resilient over time.
If you’re experiencing recurring irritation or simply want to support longevity on the court, a personalized approach can make all the difference.
Find out more about my Personalized Yoga Therapy services here.
Stay strong on the court
Pickleball should feel energizing — not depleting.
With intentional mobility work, targeted strength, and intelligent recovery, you can:
Improve reaction time
Reduce injury risk
Recover faster
Play longer
Movement longevity is possible — when your training supports your body, not just your game.
Why not book a yoga therapy session with me
Frequently asked questions: Yoga for Pickleball Players
Is yoga good for pickleball players?
Yes. Yoga can improve mobility, balance, and recovery — all essential for pickleball performance. A therapeutic approach also helps reduce repetitive strain in shoulders, elbows, hips, and knees.
Can yoga help prevent pickleball injuries?
Yoga supports injury prevention by improving joint stability, muscular balance, and body awareness. It also encourages better recovery between games, which reduces overload patterns that lead to irritation.
What are the most common pickleball injuries yoga can support?
Common issues include:
Shoulder tightness or rotator strain
Tennis elbow
Wrist irritation
Hip stiffness
Knee discomfort
A targeted yoga practice helps restore mobility while supporting stability in these areas
Should I do yoga before or after pickleball?
Both can be helpful.
Before play, focus on dynamic mobility and activation.
After play, choose slower stretches and breathing practices to support recovery and nervous system regulation.
Is yoga therapy different from regular yoga for athletes?
Yes. While regular yoga classes offer general benefits, yoga therapy is individualized and responsive. It adapts to how your body is functioning and recovering, rather than following a fixed sequence.
The transition years before menopause — can bring shifts in sleep, mood, energy, stress response, and physical comfort as hormone levels change. Yoga, when practiced with intention, supports the nervous system, helping the body become steadier, calmer, and more resilient during this transition.
This isn’t about flexibility or physical perfection. It’s about practical movement, breath awareness, and nervous system regulation.
What is perimenopause?
Perimenopause usually begins in your 40s (but can start earlier) and lasts until menopause — marked by the end of monthly periods. During this time, estrogen production changes and can affect many body systems, including sleep, mood, metabolism, and bone health.
Symptoms commonly reported include:
Hot flashes & night sweats
Sleep disturbance
Mood swings, irritability
Anxiety or low mood
Brain fog or memory changes
Fatigue
Reduced libido
Discomfort during sex
Joint stiffness or aches
Weight fluctuations
Each woman’s experience is unique.
How yoga supports the nervous system in perimenopause
Yoga helps by moving your system toward nervous-system regulation: it can reduce stress reactivity, improve breath coherence, and support calming responses. Practices that focus on steady breath and mindful movement help you shift out of fight-or-flight and into a more regulated state.
This supports sleep, reduces tension, and can make symptoms feel more manageable.
Gentle yoga practices with intentional breathing help calm the sympathetic nervous system and support emotional balance.
Better Sleep
Slow, restful sequences before bed signal safety to the nervous system and may improve sleep quality.
Physical Comfort & Mobility
Targeted movement supports circulation, eases muscle tension, and encourages joint ease without strain.
Support for Hot Flashes & Fatigue
Reclined and restorative positions can ease nervous system reactivity and support cardiovascular ease.
Yoga practices that support perimenopause
Below are some grounding practices organized by benefit and how they support your system:
1. Forward bends are good for anxiety, irritability and insomnia
Forward bends can help reduce anxiety, irritability, and tension. Folding forward and shutting out all your external stimuli will soothe your mind and reduce stress. When your nervous system signals that all is well, your adrenal glands and sympathetic nervous system can stop working so hard.
Standing forward bend
Have a generous bend in your knees and fold from your hips. Let your head your upper body hang loose like a rag doll.
Seated forward bend
Bend your knees if you need to, fold from your hips, try with a pillow on your lap to support your upper body as it folds forward. Let your head hang, maybe build up the pillows to rest your forehead.
2. Backbends help with fatigue, supported backbends help with hot flashes
Gentle-supported backbends encourage your chest and the heart to open and increase your energy. It also improves respiration and circulation and helps lift spirits. Any tension in your body can make hot flashes worse. Use bolsters, blankets, or blocks to support your entire body. Reclined poses with proper support should cool and ease hot flashes.
Reclined bound angle pose
This is one of the best therapeutic yoga poses for peri-menopause. It can be tremendously beneficial with hot flashes and fatigue.
Press the soles of your feet press together. Let your legs open like a butterfly. Put pillows on the outside of your knees to support your legs as they open. Recline and use as many pillows you need to support your back and head. Your head can be level with your back there is no need for a big arch in your back in this back bend. Make it feel good. Hang here for 20 breaths or so.
Supported Bridge pose
Bridge pose can be amazing for your pelvic floor muscles. Whilst in the pose you can place a block between your knees and squeeze to activate inner thigh muscles. Also do your Kegels whilst your hips are raised. Link below for how to guide. For a supported backbend place a block under your sacrum (flat bit of your pelvis).
Kegel exercises strengthen the pelvic floor muscles. These muscles support the uterus, bladder, small intestine and rectum. Kegel exercises also are known as pelvic floor muscle training.
Everything you do with your body can affect your thoughts and attitude. Sometimes something as subtle as a shift in posture can lighten a dark mood. Inversions can help improve a depressed mood. In effect, they are turning everything upside down. Of course being upside down also increases blood to the brain.
Legs up a wall
Start by sitting sideways to the wall with your hip pressed against the wall. Lie back and swing the legs up. Use a pillow under your head if needed. This should feel comfortable.
Triangle pose
Triangle pose is great for preventing osteoporosis, because it is weight-bearing. stimulates your abdominal organs and calms your nervous system. It also helps reduce anxiety & can help with digestive issues.
Modifications for Comfort
Use blankets, bolsters, blocks, or cushions for support
Breathe slowly: long inhales, gentle exhales
Move at your nervous system’s pace — not past it
Try positive affirmations
These allow you to challenge any negative thoughts. If you do it every day, can start to retrain the way you think. You can remove the negative self-talk and increase your self-esteem. Pick something that resonates with you.
The morning is a time to create an intention for the day.
I am strong, capable & kind.
I have the power to change my story.
I choose to respond to this challenge with grace and positivity.
I will not worry about tomorrow. I will enjoy today.
At night is a more reflective time. Perhaps a time for gratitude
I am grateful for my supportive family & friends.
I am grateful for the growth I experienced today.
Try mudras
Mudra means seal mark or gesture in Sanskrit.
Mudras are traditionally practiced to intensify the effects of your yoga or meditation practice and enhance focus. They can also be a, practical addition to your meditation by adding focus to your hands.
The Yoni Mudra is dedicated to the female Hindu goddess Shakti. Yoni means womb. The practice of Yoni Mudra is associated with strength and power.
You place your thumbs together and pointed upwards, index fingers together pointed downwards, press the other fingers together. Sit comfortably and follow your breath.
As you breathe slowly, feel the movement beneath your hands. The shape offers gentle structure, which can help the nervous system settle and organize.
Used this way, the mudra supports diaphragmatic breathing, interoceptive awareness, and a felt sense of stability — honoring tradition while remaining practical and embodied.
What happens after menopause?
If your periods have stopped for a year or more you are described as being post-menopausal.
In post-menopause, your menopause symptoms may ease or stop altogether, but some women continue to have symptoms for longer.
Because your body is producing less estrogen there can be an increased risk of some health conditions like;
cardiovascular (heart) disease
osteoporosis (weak bones)
urinary tract infections (UTIs)
So it’s really important to make sure you have a good, healthy diet and lifestyle, you exercise and keep going to your regular screenings.
When to seek personalized support
Yoga supports regulation and comfort but isn’t a replacement for medical care. If symptoms feel overwhelming or persistent, pairing yoga with professional guidance and lifestyle support provides the strongest foundation.
Ready for personalized yoga therapy?
If you want support tailored to your history, nervous system reactivity, and goals — not a generic sequence — explore our yoga therapy sessions designed for perimenopause support.